Thursday, June 11, 2015

The Challenge

Barbara Ivie Green's fine art

is now available in print! Just click here to go to site

fine art painting of two rutting deer in a mountain meadow, created by Barbara Ivie Green

The Challenge
20" x 30"
Acrylic on canvas

For Purchase info of original contact artist
barbaraiviegreen@aol.com


Wednesday, June 10, 2015

Barbara Ivie Green's Art Showing

To view an online show of my paintings please click here.
To see the available prints of my art click here to see details. 

oil painting of a bobcat next to a stream with green leaves in background, created by Barbara Ivie Green

Serene Splendor 36" x 36" oil on canvas. Also available in print! Click here or one picture to see details.


Leopold Napping 18" x 20" oil on canvas. Also available in print! Click here or on picture to see details


For information on prices of original work please contact artist at barbaraiviegreen@aol.com


Also check for my prints on these fine stores world wide

Monday, December 1, 2014

Baking with Barb- Potato Rolls


      This is the traditional roll recipe that my family has made over the years as we gather on special holidays such as Thanksgiving and Christmas. To me good food should be shared as it enriches all of our lives.

Potato Rolls

1 package yeast
(1 Tablespoon)
1½ cup warm water
2/3 cup sugar
1 ½ teaspoon salt
2 eggs
1 cup luke-warm mashed potato
7 cups flour


Peel and cut potatoes for mashing.  Boil potato until extremely soft (mushy).  Put hot potato in a blender with cooking water.  Measure water until it is 1 ½ cups add more warm water if needed.


Purée in blender, then pour into large mixing bowl.


NOTE: It's important that the potatoes are not too hot or it can kill the yeast- Like poridge, it must be just right. LOL! If it's too cold it won't dissolve.


In a large bowl combine potatoes, sugar, yeast and one cup of the flour. Wisk together and let Yeast dissolve and activate. Add to mixture the salt and eggs. (Whisk eggs in a separate cup then add to mixture.)


Add flour one cup at a time until the dough is well combined. (After the third or fourth cup I start to use my hand to knead the flour into the dough right in the bowl.) Knead dough until a smooth ball is formed.

Place in a clean large bowl that is coated lightly with oil or cooking spray; coat the top of the dough with oil and cover with plastic.  Let rise one to two hours, or until double.
 Divide in two.  (I use a large knife to cut through it.)
On a floured surface, roll out into a circle that is approx. ½ inch thick.  Coat top with softened butter and cut with pizza cutter into 8 pizza slices.


Roll loosely from the wide end to the point and place on cookie sheet.


Let rise until double and bake in a preheated 350 degree oven for 15-18 minutes. This dough also makes amazing bread and sweet-rolls. 


Friday, November 7, 2014

How to Make a Ceiling Light Escutcheon


Have you ever removed an old florescent bar light and found gaping holes where there shouldn’t be any? Or worse, learning that that your old fixture was never attached to anything but the drywall?


As you can see, that is exactly what I found.
STEP 1: Find the ceiling joists and mark them so that your next fixture is secure.
STEP 2: Mark those on your board.
This is very important!

STEP 3: Paint a base color on the selected board. I chose a pumpkin color which was a shade darker than the walls to help tie-in the color scheme.
STEP 4: Trace your design and paint it white. I chose the same paint that I painted the trim in my bathroom. See below for the pattern.


STEP 5: Next, using a sea sponge, dot the entire surface with the white paint so that it is mottled looking.
STEP 6: Using a mixture of black/brown acrylic paint trace the lines of the scroll pattern. Be sure to add some shadowing for a more three-dimensional effect.
STEP 7: Using the sea-sponge again, I mottled the surface with the wall color to help tie it into the color scheme. I thinned down the paint with a little water or you can mix it with a little glazing medium.


STEP 8: Frame with cut molding pieces painted to look like the metal light. You can use a metal spray paint or see below for the steps for painting it using acrylic paints.
For best results spay on a coat of acrylic varnish to protect it. Secure it with wood screws going into the ceiling joists (marked and measured from STEP 1) and install your new light by attaching it to the board.
-Barbara Ivie Green

PAINT THE FRAME IN FOUR EAST STEPS


STEP 1: Stain boards a cedar color.
STEP 2: Use a wax candle or white crayon to rub on the raised surfaces. (This will make it so that the next stain will not adhere to it or will RESIST the stain.)
STEP 3: Stain the boards a dark walnut color.
STEP 4: Using a soft cloth rub the raised areas to reveal the cedar stain beneath it.

PATTERN FOR LIGHT ESCUTCHEON
This is the pattern I created to go across a 1” X 12” X 50 ½” board. Not shown is a border that I added around the edge.
My light was centered between two ceiling joists which were 16” on center. This length gave me 8 places where I was able to screw into the ceiling joists too.


Permission granted to copy this pattern for the purposes of creating the light escutcheon.
To reprint, credit must be given to artist Barbara Ivie Green with link to this site.


Sunday, September 28, 2014

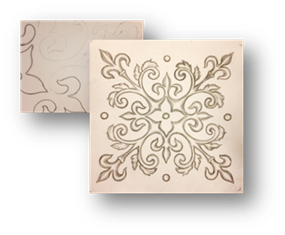
DIY How to make a faux wood floor medallion


STEP 1: Fold a piece of paper in eight sections, four creases radiating out from the center as shown.


STEP 2: Starting in one section, draw a design that will be repeatedly traced to the next section creating a pattern.


STEP 3: Transfer the drawing onto a self-adhesive piece of craft foam. Shown below.


STEP 4: Mount on a wooden board and carve out design using a craft-knife.


STEP 5: Embellish with scrap pieces using a paper punch if so desired. In my floor design I opted to have just the center piece and didn’t ink the edges.

STEP 6: Using a braying tool, ink the design and stamp onto the faux wood concrete with the stain used in your graining project.


Monday, August 25, 2014

DIY How to Paint a Faux Wood Cement Floor


STEP 1: Clean the cement floor and apply a degreaser or floor preparation that will make the paint adhere to the cement. There are several products on the market.

(*NOTE* If you have a floor which has paint on it that won't come up, especially if it is oil-based paint the water-based stain or paint will not adhere to it. You may have to use an oil based enamel like Cement Porch enamel paint or by treating the floor with a primer so that regular acrylic paint/stain will adhere to it.)


STEP 2: Select a color of water-based stain and paint the floor with a roller. The color should be lighter than the wood as it will be the highlight of the wood grain. 


STEP 3: After the floor has dried. Mix a batch of paint for the grain. This should be darker than the floor color. I used a water base-stain (in this case black) with equal parts glazing medium.

STEP 4: Mark out guidelines for each plank of faux wood flooring on the floor with a pencil.


STEP 5: Brush the stain/glaze mixture onto the area of one plank. Using a graining tool, pull it down the board by rocking it back and forth, as you pull it through the stain. (I will be adding a story board here soon that shows the process a little better.)


STEP 6: Protect your work of art by coating it with a sealer. There are many on the market. This floor was treated with an epoxy resin which was troweled on for extreme protection.


Saturday, June 28, 2014

Kung Fu Fire Tiger-Dragon Shield with Chrome Mantis

This is the first shield created for the Kung Fu series I'm working on.


Read more about this on my graphic arts page:

 http://barbaraiviegreengraphicarts.blogspot.com/2014/06/kung-fu-fire-tiger-dragon-shield.html